Implementing AI for Real-Time Anomaly Detection in Images

The journey of taking an open-source artificial intelligence (AI) model from a laboratory setting to real-world implementation can seem daunting. However, with the right understanding and approach, this transition becomes a manageable task.
This blog post aims to serve as a compass on this technical adventure. We'll demystify key concepts, and delve into practical steps for implementing anomaly detection models effectively in real-time scenarios.
Let's dive in and see how open-source models can be implemented in production, bridging the gap between research and practical applications.
Understanding Unsupervised Anomaly Detection
Unsupervised anomaly detection is a machine learning technique that uncovers unusual patterns or outliers in data, without any prior training on what these anomalies might look like. In the context of images, this means identifying areas within the image that deviate significantly from what's considered 'normal'.
Implementing that in real-time involves using deep-learning models which can rapidly process incoming visual data, detect irregularities in a matter of milliseconds, and respond accordingly. It's like having a vigilant digital watchdog capable of recognizing anything out-of-the-ordinary at high speed.
With open-source models, you have access to this technology as well as the collective wisdom of researchers and developers worldwide who continually refine these tools for better performance.
Role and Importance of Anomaly Detection in Images
Anomaly detection in images plays a crucial role in numerous fields, ranging from healthcare to security. In healthcare, it can aid in identifying abnormal structures or changes in medical imagery like X-Rays or MRI scans, potentially flagging early signs of diseases. In security applications such as surveillance systems, it can help detect unusual activities or objects within the monitored area.
The importance of anomaly detection also extends to quality control in manufacturing, where it can spot defects on assembly lines avoiding costly recalls and, hopefully, ensuring customer satisfaction.
Real-time implementation of open-source models for this purpose allows these sectors to react quickly to anomalies and make informed decisions instantly.
Anomalib: A Deep Learning Library for Anomaly Detection in Images
Anomalib is an open-source library for unsupervised anomaly detection in images. It offers a collection of state-of-the-art models that can be trained on your specific images.

Example of an anomaly detected with Anomalib
For achieving the best training results, it is advised to obtain a suitable quantity of images that are free from any abnormalities. It is preferable to have a few hundred images for this purpose. Furthermore, in order to perform testing and validation, it is recommended to acquire a few images that do include anomalies as well.
If your images have anomalies, you'll need to make a mask highlighting these areas. You don't need a sophisticated tool for that. For example with GIMP, it's as simple as:
- Drag and drop your original image (e.g., "001.png”) into GIMP.
- Go to the Layer menu and select New Layer.
- With the new layer selected, use the Pencil tool set to white to mark the anomalies.
- Use the Bucket Fill tool to color the unmarked areas in black.
- Save the mask using File -> Export As, naming it "001_mask.png".
Keep in mind that masks are for testing, not training. Thus, only a few anomaly images are required for this.
Afterward, you can train one of the Anomalib models and test its performance under simulated conditions. I would recommend EfficientAd or FastFlow for real-time applications, as they are significantly faster than other models as of October 2023. Additionally, you can explore Anomaly Detection on Paper With Code to find the ideal model for your specific use case.
The easiest way to get started with Anomalib, is to clone their repository from Github and use the train script as follows:
python tools/train.py --config <path/to/model/config.yaml> --model <model name>
Sample config files are available in the repo, and it lets you set the paths of the folders containing your pictures for training and testing. Then, once your model is trained and validated, you can use the inference script to test it under simulated conditions on a single image or a folder of images. For example, with PyTorch, you can run the inference script as follows:
python tools/inference/torch_inference.py \
    --weights results/your/model.pt \
    --input your/image.png \
    --output results
This will generate a visualization that highlights the areas of the image that the model has identified as anomalies. You can set the flag --visualization_mode between full and simple to change the visualization mode. Select full to view the original image with its mask, heatmap, and segmentation.
From Lab to Live: Implementing Your Models With ONNX or OpenVINO
Once your model has been trained and validated using Anomalib, the next step is to prepare it for real-time implementation. This is where ONNX (Open Neural Network Exchange) or OpenVINO (Open Visual Inference and Neural network Optimization) comes into play.
ONNX offers a standardized platform that allows you to export your trained model into a format that can be easily implemented and run in various environments.
OpenVINO is another toolkit but developed by Intel. Its primary purpose is to facilitate the rapid deployment of deep learning models for inference.
To convert your model, you will need to add this configuration to your config.yaml file to export your model to ONNX or OpenVINO format after training.
optimization:
  export_mode: < openvino or onnx >
Once converted, the model can be embedded in your application with ONNX Runtime or OpenVINO Inference Engine respectively.
Deploying New Models in Shadow Mode
Deploying in shadow mode is a crucial step when introducing a new model to production. This deployment strategy involves running the new model alongside your existing system without directly influencing the output, essentially running in the "shadow".
It's like having a student trying to outperform the master. During this phase, both models process each image concurrently but only results from your current system are utilized, while outputs of the new model are monitored and compared for any discrepancies.
This allows you to assess how well the new model performs under real-world conditions without risking any impact on your operations if it doesn't perform as expected. It also provides an opportunity to fine-tune parameters or retrain the model with more specific data based on its performance during shadow operation.
Once satisfied with its performance and reliability, you can then switch over from your old system to this newly deployed model.
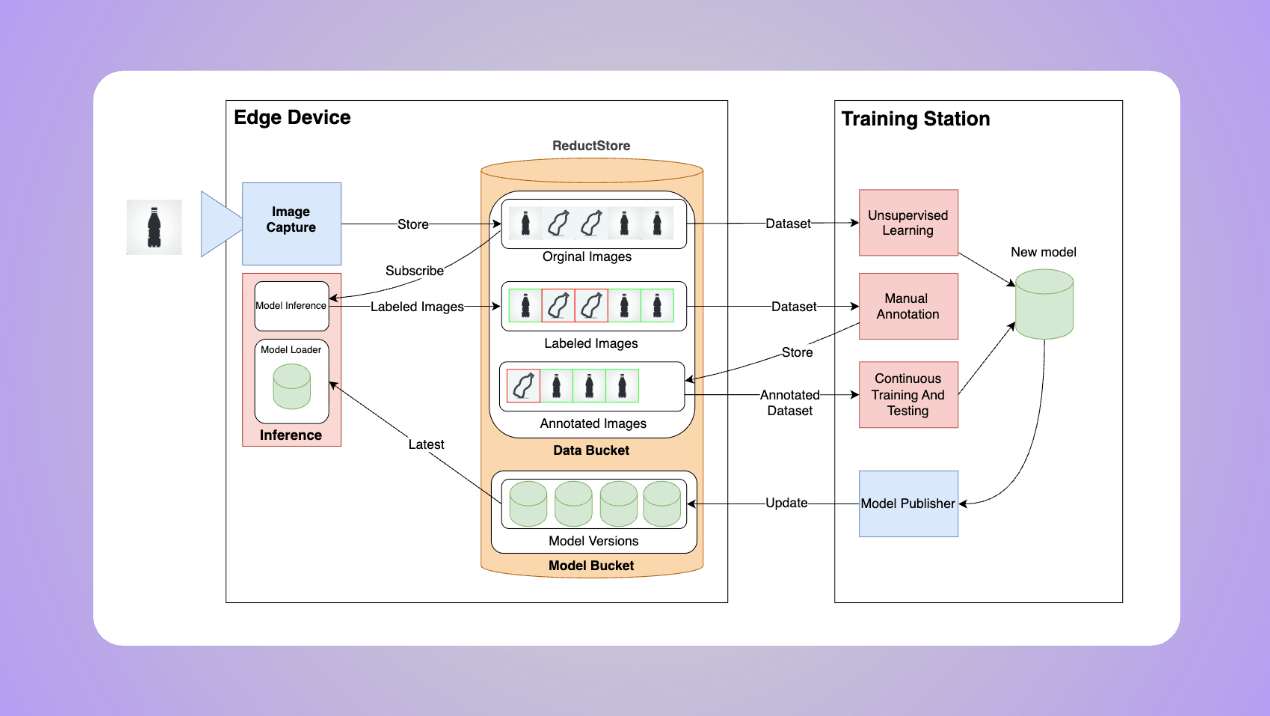
ReductStore: Storing AI Labels and Models at the Edge with a Time-Series Database for Blob Data
ReductStore is an innovative time-series database designed specifically for managing Blob data, making it ideal for our needs in real-time unsupervised anomaly detection. The true strength of ReductStore lies in its ability to store not just raw data but also AI labels within the metadata and models at the edge.
To better visualize how ReductStore can integrate with your machine learning workflow, from data capture to inference, consider the following diagram. It provides an overview of how we can make the most out of AI labels and models stationed at the edge.
Diagram illustrating the flow of data capture, storage, inference, and training with ReductStore.
AI labels indicate the outcomes of your model's evaluation on each picture, like the presence or absence of an anomaly in our case. By storing these labels alongside your images in ReductStore, you can streamline your system's workflow and make the whole process simpler.
Furthermore, annotated images are manually labeled or validated by a human operator, and then stored in ReductStore. This annotation can be the actual label inferred by the model which is then validated by a human operator, or it can be more complex, like a mask highlighting the areas of the image that the model should identify as anomalies. This allows for continuous improvement of your model's performance over time.
Meanwhile, keeping models at the edge means deploying your trained models directly onto end-user devices or closer to where data is generated. This method cuts down on latency issues since you don't need to transmit large volumes of image data over networks; instead, you analyze it right where it’s collected.
Conclusion
In conclusion, implementing open-source models for real-time unsupervised anomaly detection in images is a multi-step process that involves transitioning from lab to live.
By selecting the right model, testing under simulated conditions, integrating it into your existing system and regularly monitoring its performance, you can effectively detect anomalies in image data.
Utilizing tools like Anomalib and ReductStore help to facilitate this process by providing robust models and storage solutions respectively. Deploying new models in shadow mode further minimizes risk during the transition phase ensuring that your operations remain unaffected while introducing new models into your system.
Stay tuned for more advancements in the field of unsupervised anomaly detection and the continuous evolution of tools and techniques that will make the process even more streamlined and efficient in the future!